Overview
This guide will walk you through accepting your company's ChatGPT Business invitation and merging your personal data with the business account. The process ensures you maintain access to your existing conversations while gaining access to enhanced business features.
Important Notes:
- Staff are not to invite other users - user requests must be made to itsupport@cyp.org.au for approval. Failure to do so will result in the invited accounts being cancelled without consultation.
- Red boxes in screenshots indicate where you should focus your attention
- If you encounter any issues, contact IT Support at itsupport@cyp.org.au
- The data merge process is permanent and cannot be undone
Step 1: Understanding Your Account Status
After receiving (but before accepting) your business invitation, you'll notice two accounts in ChatGPT:
- Your existing Personal account
- The new Cape York Solutions Workspace (business account)
Important: At this stage, your data is NOT shared between accounts. You'll need to complete the merge process to consolidate your information.

Step 2: Accept the Business Invitation
- Check your email for an invitation from OpenAI (noreply@tm.openai.com)
- Look for the subject line: "IT Support has invited you to ChatGPT Business"
- Note: Your email security may block some content - this is normal
- Click the "Join workspace" button in the email
The invitation email will specify which email address you're joining with (e.g., gbrowne@cyp.org.au).

Step 3: Welcome to the Workspace
After clicking the invitation link, you'll see a welcome screen with three information panels:
- Made for use at work: Chats in the business workspace are not used to train AI models (important for privacy)
- Ask away: General ChatGPT capabilities overview
- Check your facts: Standard disclaimer about verifying information
Click "Okay, let's go" to continue.

Step 4: Select Your Role
Choose the role that best describes your position:
- For most staff: Select "Team Member/Individual Contributor"
- If unsure: Choose "Team Member/Individual Contributor" or click "Skip"
Why this matters: Role selection helps ChatGPT tailor responses to your work context and provide more relevant assistance for your responsibilities.

Step 5: Select Your Work Type
- Select all work types that apply to you (you can choose multiple)
- For IT staff: Select "Information Technology (IT)"
- For other roles: Choose the most appropriate options
- Click "Continue" after making selections, or "Skip" if unsure
This selection helps ChatGPT understand your work context for more targeted assistance.

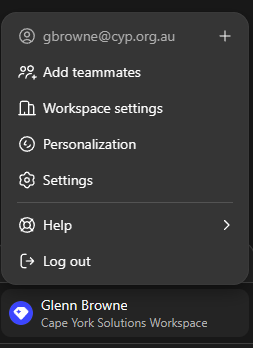
Step 6: Access Settings for Data Merge
- Click on your profile at the bottom left of the screen (shows your email address)
- Click "Settings" from the menu that appears
You should now see that you're in the business workspace, but you may still have access to switch to your personal account.

Step 7: Navigate to Data Controls
- In the Settings menu, click "Data controls" from the left sidebar
- Scroll down to find "Merge data from your personal workspace"
- Click the "Merge" button

Step 8: Confirm the Data Merge
⚠️ CRITICAL STEP - READ CAREFULLY BEFORE PROCEEDING ⚠️
You'll see a confirmation dialog showing:
- Source: Your Personal workspace
- Destination: Cape York Solutions Workspace
Important Warnings:
- Transfer is permanent and cannot be undone
- Your chat history and GPTs will be migrated to the business workspace
- Plugins and custom instructions from your personal workspace will be deleted
- If you have ChatGPT Plus subscription, it will be cancelled and refunded
- You will lose access to your data if you leave the company or are removed from the business workspace
Action Required:
- If you're ready to proceed: Click "Confirm merge"
- If you have concerns: Click "Back" and contact IT Support at itsupport@cyp.org.au

Step 9: Verification - Process Complete
After successful merging, you'll notice:
- Your profile now only shows one account: "Cape York Solutions Workspace"
- There's no longer a separate "Personal account" option
- All your data is now consolidated under the business workspace
Congratulations! Your ChatGPT business onboarding is complete.
Support and Troubleshooting
Need Help?
- Contact your manager for policy questions
- Contact IT Support at itsupport@cyp.org.au for technical issues
- Include screenshots and detailed description of any problems
Key Reminders:
- The merge process cannot be undone
- Your personal ChatGPT Plus subscription will be cancelled if you had one
- Business workspace features include enhanced privacy and collaboration tools
- All conversations in the business workspace are subject to company policies
Quick Reference
| Step | Action | Key Point |
|---|---|---|
| 1 | Receive invitation | Two accounts visible, data not shared yet |
| 2 | Click "Join workspace" in email | Accept business invitation |
| 3 | Click "Okay, let's go" | Acknowledge welcome information |
| 4 | Select role | Choose "Team Member" if unsure |
| 5 | Select work type | Choose relevant types, "Continue" |
| 6 | Profile → Settings | Access account settings |
| 7 | Data controls → Merge | Start merge process |
| 8 | Confirm merge | Permanent action - read warnings |
| 9 | Verify completion | Only business account remains |
Remember: When in doubt, contact IT Support before making irreversible changes!